Managing participants
Once the study is live, we are in the recruiting phase of the study. However, many of the functions intended for the recruiting phase should be used during CRF validation and/or user acceptance testing.
Recruiting phase is the phase of active data collection. Every step and action is automatically tracked in the audit trail. You can view the current recruiting status and the last changes in the audit trail via recruiting → overview at any time.
Participant list
The participant list is available form the respective entry of the main menu. It shows a complete list of all participants, you have access permissions for (i.e. your center(s)).
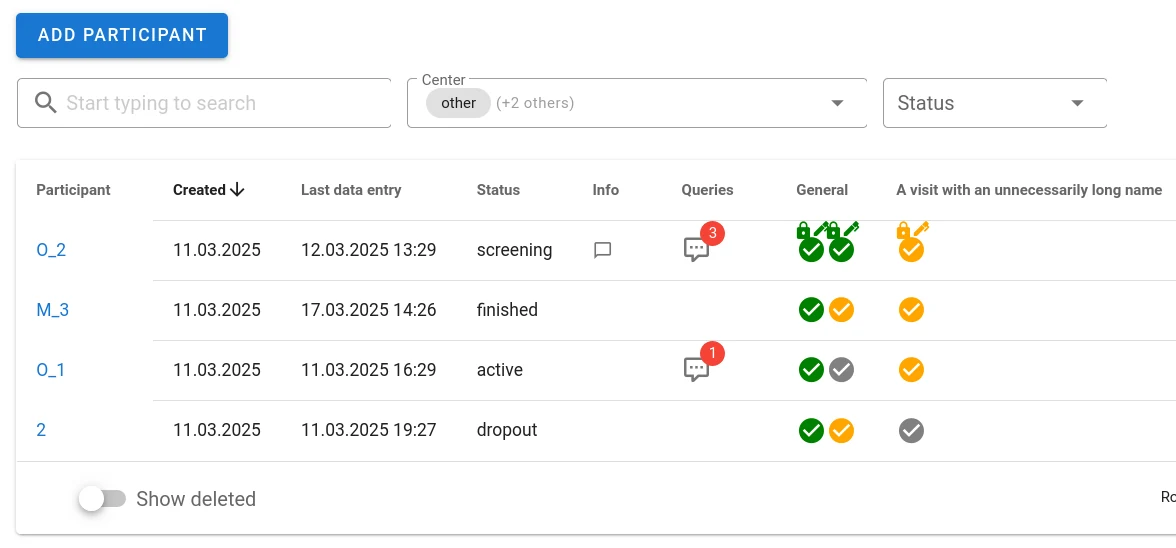
The list can be filtered by multiple criteria including participant ID, center and participant status. The search field will accept searching for participant IDs and also complete survey-login identifieres (partial identifieres will not match).
The list can be sorted by any of the following criteria by clicking on the respective header. Clicking again will reverse the sorting order.
- Participant ID
- Creation date
- Date of last data entry
- Participant status
- Presence of notes/info
- Presence of queries
Clicking on the participant ID will directly take you to the participant view for the respective patient. Clicking on a form symbol (check mark) takes you directly into the form of that participant.
The system will remember filter and sorting settings as long as you just click on items in the view and return to the overview using the Back button of your browser. Opening other menus in the system and returning to the participant list by clicking Participants in the menu will reset all filters.
Your role in the study and the permissions associated with it determine what kind of access you have: Users only have access to participant(s) in their own center(s).
Forms can have different states:
- Gray checkmark symbol
- The form has been assigned to the participant but processing hasn't started, yet.
- Yellow checkmark symbol
- The form is in progress but not all required answers have been entered, yet and/or the site users ahve not clicked finished, yet.
- Green checkmark symbol
- The form has been finished.
In addition to the main status indicator, there can be additional symbols:
- Padlock
- A padlock indicates that the form has been locked. No further data can be entered. Only users with respective permissions can unlock the form to add additional data.
- Pen
- A pen symbol indicates that the form has been signed.
- Double checkmark
- The green doiuble checkmark indicates that the form has been verified.
All of those are shown in the participant views, some also in the partcipant list.
Adding a participant
To add a participant go to recruiting → participants and click "add participant"
You automatically enter the participant screen.
Adding and editing participants' data
After adding a new participant you automatically will enter the participant screen. You can also enter the participant screen via recruiting → participants and clicking on the respective participant.
In the participant screen you can add and edit all data connected to the patient (if you have the needed permissions). You have following options:
Delete participant
The respective participant will be marked deleted. Documentation of a reason for deletion is mandatory. Additionally, participants can't be deleted completely but only marked as deleted during the recruiting phase. If you want to view deleted participants click on "show deleted participants" in the participants overview at recruiting → participants.
Only users with respective permissions can delete participants.
Participant status
A status can be assigned to each participant (e.g. "screening failure", "drop-out", etc.). Available status can be defined under setup → general → monitoring → participant status
To assign a predefined status to a participant, just click the drop-down menu below the participant ID and select the respective status from the list.
Generate survey login identifier (only surveys)
This will generate a unique identifier for this participant.
Comments
Enter a comment to this participant.
Visits: send survey (only surveys)
You can send the survey to the respective participant.
Visits: open/edit form
Manage all data in the context of the participants froms. More details see 3.2.2.
Files
Upload files connected to the participant.
History
Track of all changes of the patient.
Questions about Magana Trial Manager?
Try setting up your own eCRF in a free test account, or reach out to our team in Regensburg — we usually reply within one business day.