Study configuration
On this page (27)
- Basic study settings
- Changing the name of the study
- Enabling and disabling Modules
- Adding a logo
- Managing languages
- Primary language
- Managing study centers
- Adding or editing a center
- Deleting a center
- Configuring participant IDs
- Using predefined schemes of participant ID generation
- User management
- Adding a user to your study
- Assigning a role to a user
- Deleting a user
- Roles and permissions
- Available permissions
- Defining and deleting roles
- Manage permissions on form level
- Regulatory Settings
- Signatures
- Notifications
- Setup of Notifications
- Biosample management
- Setup of Biosamples
- Generating sample IDs and barcodes
- eConsent Setup
You find the general settings of your study in the navigation bar under setup → general. The setting options include the name of the study, language settings, the logo as well as center and user management. Each setting can be changed at any time - even if the study is already live.
Basic study settings
The study settings can be accessed via Setup → General → Study.
Remember to click "save" after any change of the study settings.
Changing the name of the study
To change the name of your study, simply click into the field "study name" and change the study as you wish. You can use up to 25 characters for your name (including spaces). Special characters like "*'?)%" can be used, too.
Enabling and disabling Modules
In the field "modules" you can enable or disable purchased modules. Disabled modules won't be visible to any user. Enabled modules will be visible and accessible only to users with respective permissions. If you need access to additional modules currently not included in your contract, please contact our service team (info@maganamed.com) or your account manager.
Adding a logo
Especially bigger studies usually have a logo. To add a logo just click "upload" and select the respective file. The software supports all common image formats.
The logo will appear on surveys and can be added to individual forms.
Managing languages
The graphics user interface (GUI) of Magana Trial Manager is in English and targets professional users such as study managers, physicians, study nurses, monitors etc. However, sections of the GUI that are primarily used by local site personnel can be translated to other languages and a few options are available already. If you need a language that is not available yet, please contact us.
Users can set their language preference in their account settings (Account icon > Interface language). All parts of the GUI that have not been translated, will be shown in English, irrespective of user settings.
Independent of the GUI language, you can configure different language settings for the eCRF itself. Our language concept assumes that there are two classes of languages used:
- Primary language
- Additional language(s)
Primary language
The primary language is the language in which you design and implement all forms of a study. Typically, this will be either English or the native language of the leading center/sponsor/etc. Upon creation of a new study, you will be asked to set the primary language. It is possible to change this later (Settings > General > Primary language). However, we strongly recommend to only change this setting before implementing the majority of forms because later change can easily cause confusion.
Additional languages
If you want to provide some or all forms of your eCRF in other languages than the primary language, you can do so following these steps:
- Finalize the CRF design in the primary language
- Add more languages as needed (Setup > General > Additional languages)
- Add translations for your forms, form names and visit names.
After setting your additional languages, you can switch between languages in the form editor by selecting the desired language from a drop-down menu:
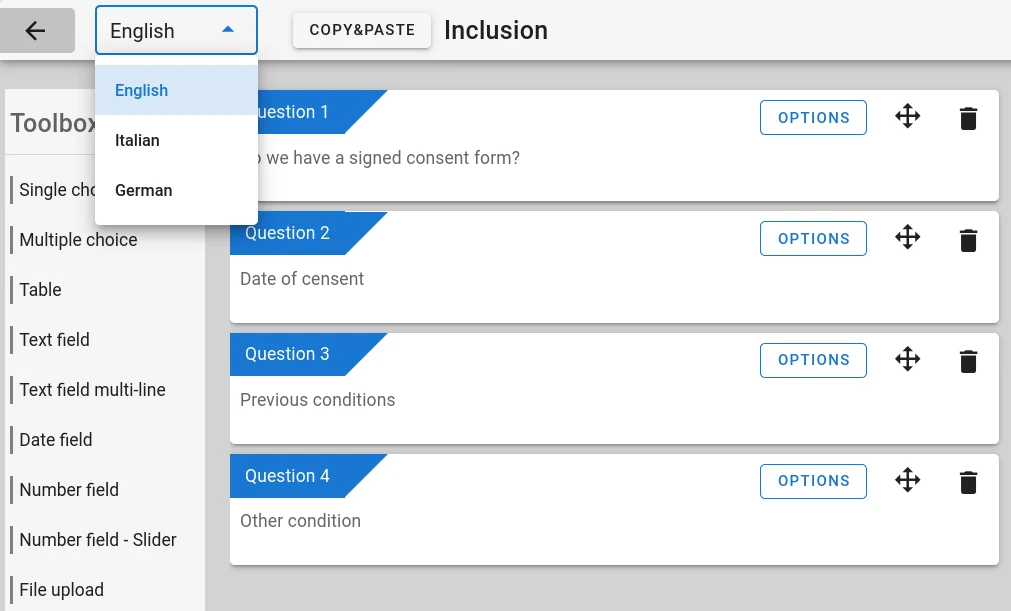
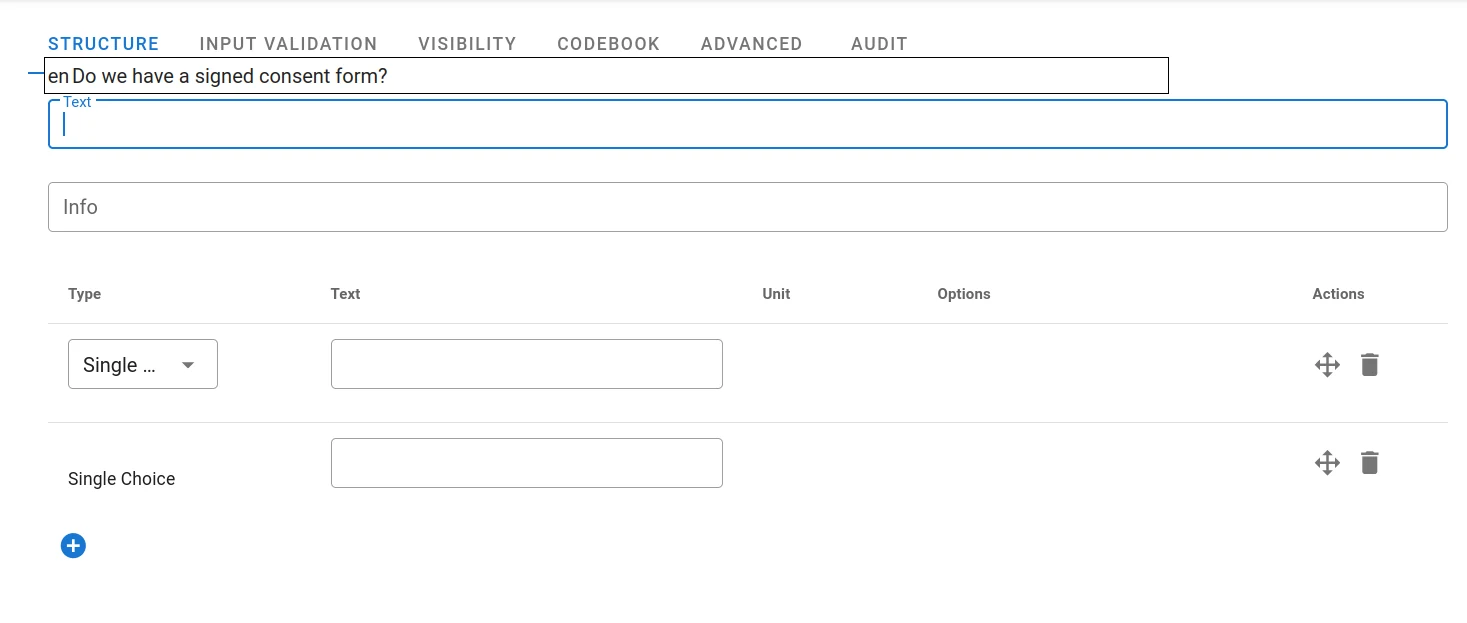
After switching language, you can add/edit the selected language version. In order to aid the translation process, the system will display the content in the primary language as a tool-tip so the translator does not have to switch back and forth between languages.
It is also possible to translate the names/titles of visits or forms. This can be done under Setup > General > Translations
Setting language preference
For each study site, you can st the preferred language under Setup > General > Study Centers by clicking Edit and selecting the preferred Primary Language from the drop-down menu. However, site users are not limited to the language set here but can always choose a different language from the drop-down menu at the top of each participant form.
Visit and form titles are shown in the primary or local language following these rules:
- If the user has access to only a single center, the language configured for the center is used. This is a typical case for site users such as study nurses.
- If the user has to access multiple centers, the study primary language is used. This would typically be the case for users in central roles – e.g. study managers, monitors or data managers.
- Survey participants will always see the language that was configured for their center but can switch language the same way as site personnel.
Data structure in multilingual studies
The translations configured as described above, affect the way forms are presented to the users. Internally, the system "knows" that different translations refer to the same data points/fields and stores them accordingly. I.e. entered data is stored in the same database fields irrespective of the form language and the same variable names (as defined in the code book) apply. For numbers, dates, multiple-choice, single-choice etc. this unified storage makes subsequent data analysis very convenient. For text fields (i.e. free input) you need to keep in mind that all input is stored as entered. I.e. you need to deal with translating text input after the fact if needed.
Caution: During validation of your forms, make sure to check that translations really match the original design in the primary language because translation errors or line mix-ups (especially in single/multiple choice questions) will affect the validity of your data!
The obtained clinical data / answers of participants will be stored in the same database independent of the language and thus can be displayed independent of the language selected for data entry.
Managing study centers
The center management can be accessed via Setup → General → Centers.
Adding or editing a center
To add a center click on the blue button in the top left corner labeled with "add". Enter the name/number/IO of the center and define a prefix for participants from that center. To create the new center, click "save".
For each center, a unique prefix must be defined. This prefix will be part of
the participant ID and ensures that IDs are unique throughout the entire study.
Prefixes can contain digits, letters and special character. We recommend to end
each prefix with an underscore (_) or dash to make them easy to recognize but
this is only a recommendation. Some common prefix schemes:
B_for center Berlin,M_for Munich ...DE_Mfor Munich,ES_Mfor Madrid, ...001for Brussels,002for Rome, ...1-for Athens,2-for Istanbul
For each center the decimal separator can be changed. The separator can be
a comma (e.g. 1,56 as used in Germany) or dot
(e.g. 1.56 as used in the USA, Great Britain, ...).
You can also choose the desired date format for each study center to match the local practice.
Roles of users are not automatically extended to the newly created center but must be assigned separately. This ensures that permissions are not inherited unintentionally and allows selective user and role management (e.g. exclusive monitors for different centers).
To edit the name or prefix of an existing center, click on "edit" on the right side of the center's name. Caution: changing the prefix of a center, will not affect IDs of any participants already present in the study.
To add a center, the multicenter module must be activated.
Deleting a center
To delete a center click on the three dots on the right side and select delete. The deletion of a center can't be undone. Be careful when deleting centers.
The deletion has no effect on participants and data derived from that center (when the study is live). If the study is still in test mode, deletion of a center will result in the deletion of the respective participants.
A study must have at least one center.
Configuring participant IDs
The scheme of generating participant IDs / pseudonyms are generated is configurable.
Using predefined schemes of participant ID generation
The following predefined schemes are available, by default:
- Center prefix and incremental number without leading zeros (
NYC_123) - Center prefix and incremental number with leading zeros (
NYC_00123) - Center prefix and four random characters (
NYC_XKFE)
Creating your own scheme of participant ID generation
To create your own scheme, select "custom pattern". Following expressions can be used:
$cpThe center prefix which was defined in the center setup.$iUses incremental (1,2,3, ...)$i4Uses Incremental four digits number with leading zeros (0001,0002, ...). The 4 can be replaced by 2 to 6 to generate two to six digit numbers.$r4Four random characters (FZ7L,WRDB,63K9, ...). The 4 can be replaced by 2 to 6 to generate two to six random characters.$rl4Four random letters(TULD,WODP,QQPP, ...). The 4 can be replaced by 2 to 6 to generate two to six random letters.$rd4Four random digits (8163,2294,6294, ...). The 4 can be replaced by 2 to 6 to generate two to six random letters.
The expressions can be combined to result in your own scheme for
participant ID generation. e.g. If the center prefix was defined as ABC,
the expression $cp$i3 will result in the following participant IDs:
ABC001, ABC002, ABC003, ...
Always include the center prefix in your ID scheme, except for single-center studies.
Manual participant ID modification
We strongly recommend to let the system create all participant IDs and not require manual entering or editing of participant IDs, because manual entries are error-prone and the participant ID is a crucial element in correct data identification.
In some cases, however, there are external requirements that force investigators to use external IDs. In order to allow editing participant IDs, select the respective option in Setup > General > Study > Participant ID. Site users will now be able to edit the participant ID generated by the system upon participant creation and also at a later time. Only users with add permission can use this feature. Please make sure to carefully train such users in order to prevent unintended ID changes.
User management
The user management can be accessed via Setup → General → Users.
Adding a user to your study
You can add an unlimited amount of users to your studies. To grant a user access to your study click on "add user". Type in the person's first and last name plus a valid e-mail address. Click "add" to finalize the invitation. The user will be able to select the study in the title bar from now on. In addition, the user will receive an email with the link to your study.
Assigning a role to a user
Every user of the study must be assigned a role in order to receive permissions. In order to assign a role to a user, click "permissions'' on the right side of the user's name. Assign a predefined role to the user and select additional permissions if applicable. Every user must have a separate role for each study center.
Deleting a user
To delete a user, click "delete" on the right side of the user's name. The deletion of a user cannot be undone. Be careful when deleting a user. The deletion of a user will not affect the account of the user but only its access to the selected study. Any data created by this user for this study will also not be affected in any means.
Roles and permissions
Each user must be assigned a role to define the permissions respectively. Roles can be created by users with appropriate permissions. Subsequently, each role can be assigned to any number of users. Each user can only have one role per study center at a time.
Available permissions
Permissions are set on three different levels:
-
Study permission: access to general settings, eCRF setup, audit trail or the possibility to set a study live.
-
Role permissions: These permissions define for each role what the respective role can view, edit or setup. Each role then can be assigned specifically for each center. So one person can for example have the role "nurse" in center A (with the permission to view, add and edit participants) and the role "monitor" in center B (with the permission to view participants and open/close queries).\ Note: Each study setting is different. This requires full flexibility in the definition of different roles and permission. Thus, MaganaMed does not predefine roles like "Nurses" or "Monitors", as the respective needed permissions can vary between different studies.
-
Form permissions: It can be defined which role has access to the respective form in a specific visit. One example for an application is, when a lab shall only have access to one particular form in one visit to fill in the lab results.
Study permissions
- Study general settings and go live
- This option enables a user to access all general settings and to set the study live. Having this permission makes the user essentially omnipotent! Accordingly, this should be restricted to a small number of people.
- Audit trail access
- Allows the user to see the top-level audit trail. The detailed audit trail on the question level is accessible to anyone with view permission in the respective center.
- Forms and visits setup
- This option enables the respective user to add, edit and delete forms. So it is required for the people who create the forms.
Role permissions
All role permissions apply per center/study site.
- View
- View participant data, forms, queries, audit trail
- Add
- Add new participants to the study
- Edit
- Edit participant forms, add comments and respond to queries
- Delete
- Delete/archive participants
- Lock
- Lock forms for editing
- Sign
- Sign forms
- Verify
- Add verifications to forms – e.g. SDV.
- Identity
- Add, edit and view identifying participant data (like name, date of birth, phone number, email address etc) stored in the Identity Manager.
- Query
- Open and close queries. Answering queries just requires Edit permission.
- View randomization
- Access the randomization result – i.e. unblind the user with respect to study arm/group
- Randomize
- Trigger randomization of a participant
- Import
- Import data from csv files into the database
- Export
- Export data and use the data exploration tool
- Biosamples
- Access the biosample module for biosample barcoding, packing and life cycle
management.
Merely docuenting biosamples only requires Edit permission
Defining and deleting roles
To define a new role:
- enter setup → general → users
- click on "manage roles".
- Then click the "+"-symbol
- define the name of the role
- set permissions of the role
To delete an existing role
- enter setup → general → users
- click on "manage roles".
- Then click the "x"-symbol at the right side of the respective role
- confirm deletion
Manage permissions on form level
Sometimes, a role shall only access specific forms of one visit (e.g. the lab only the forms to collect diagnostic lab values). For this, access to forms can be managed on form level.
To assign the access to a form a visit to a specific role:
- Setup the visit and assign the form to the visit
- Go to Setup → users
- Click "Manage form permissions"
- Assign the target form of the respective visit to one or more roles
Regulatory Settings
In the tab Regulatory, you will find a few options that (de-)activate certain features with regulatory significance. By default, all of them are activated as they should be for regular studies under GCP and similar regulations.
If your regulatory situation is different, you can choose to turn off some or all of them.
Please consult with your regulatory expert(s) before deactivating any of the following features and make sure to document the decision appropriately.
Signatures
You can configure the meaning of signatures in your study by editing the
Signature meaning field. If you need more than one type of signature, you can
add additional signature types by clicking the  symbol. Each type of signature can be restricted to selected roles.
After go-live, the system will prevent you from making any structural changes to a form once at least one copy has been signed. By removing the checkmark Before changes can be made in the form designer, all signatures must be invalidated. you can turn off this behavior: the system will now allow making changes to forms, even if they have been signed.
See also section Changes after Go-Live.
Reason for change
By default, the system will require users to provide a reason for change when a data point is changed after the respective form has been finished. Study managers can define a list of allowed reasons to choose from here.
It is also possible to disable this feature.
Notifications
To set up notifications enter setup → general → notifications.
Notifications are used to automatically send emails to members of the study team if a predefined event occurs.
Setup of Notifications
- click "add notification
- assign any name to the template under which you want to save it
- Select an notification trigger
- event (predefined events)
- participant created
- query created
- signature invalidated because of edit
- verification invalidated because of edit
- form added to participant
- form finished
- form signed
- computed term (any entry or combination of entries into forms)
- for programming see MaganaScript
- event (predefined events)
- Select recipients
Note: only persons with access to the current study can be notified
- Select subject of the sent email
- Enter notification text
- CLICK SAVE (notifications are not saved automatically)
Following expressions can be use in the subject and in the text:
{{study}}: name of the study{{center}}: name of the center of the participant{{participant}}: pseudonym of the participant{{user.name}}: name of the user who caused the event{{participantForm.name}}: name of the form
Biosample management
To set up biosamples enter setup → general → biosamples.
The Biosample module supports you in the complete workflow related to the samples. From label creation over sample shipping to status tracking, the entire life-cycle of a sample is covered.
- Barcode generation for sample labeling
- Barcoding of secondary containers for shipping
- Documentation of the sample life-cycle from collection to measurement
Setup of Biosamples
A sample set contains all samples which are collected at a given time point at once. This can be only one sample tube or this can consist of various tubes (e.g. Heparin plasma, EDTA plasma, serum).
Create a new sample set type
- click the blue button labeled with "new"
- assign name
- Decide if unregistered samples are accepted.
(Allow unregistred biosample IDs) - click save
The third point is important: By default, biosample codes will only be accepted by the system if the have been created and registered in the packaging step before use. That protects you against scanning unrelated codes or tubes that have no relation to your study. However, in some situations, you have no control over the codes on sample tubes at the sites. E.g. when they must be provided by the local lab or come from some external software without going through a central packaging step. In those situations, please select the option Allow unregistred biosample IDs. Now, no packaging/registration step is required and site users will be able to scan any code into the bio-sample management field.
Create tubes of sample set
- click the blue button labeled with "EDIT" next to the sample set
- Go to the headline "Tubes"
- Type in sample tube type (e.g. EDTA plasma)
- click "add"
- Assign the colour of the tube barcode by typing in the color (e.g. red) in the column "color"
- If a barcode is needed to identify the tube enable the sticker checkbox. If another identifier for the tube is used instead, you can enable the identifier checkbox. This option will allow you to scan or type in any code during the study.
- Click on the blue "SAVE" button to save your changes
Any tube can be moved or deleted by using the symbols next to the respective tube in the column "action".
Create life cycle stages of sample set
- click the blue button labeled with "EDIT" next to the sample set
- Go to the headline "Lifecycle"
- Type in your defined time points, which you want to document during your study (e.g. blood drawn, frozen at -20°C, frozen at -80°C, shipped to lab)
- click "add"
- Click on the blue "SAVE" button to save your changes
Any tube can be moved or deleted by using the symbols next to the respective tube in the column "action".
Generating sample IDs and barcodes
According to your settings (see above) barcodes for sample sets and (if selected) sample tubes can be generated, printed and exported.
Generating sample IDs
To generate IDs for each sample set
- click on the three dots on the right side of the respective sample set
- select "generate IDs".
- Select the needed amount by using the slider.
- Click "generate" to generate the selected number of IDs.
Downloading/exporting sample IDs
To download the generated IDs for each sample set
- click on the three dots on the right side of the respective sample set
- select "download IDs"
- the generated IDs will be downloaded as CSV-file
Generating 2D barcodes from sample IDs
To generate 2D barcodes for each sample set and (if selected) also for each tube,
- click on the three dots on the right side of the respective sample set
- select "print IDs"
- adjust sizes and borders according to your paper template
The big 2D barcode is intended for the bag which contains the set of tubes. Each tube barcode (if selected (see above "Create tubes of sample set") consists of a smaller 2D barcode each, which is additionally labeled with the colour selected for the respective tube.
Once all adjustments have been made, click "print" to print the barcodes.
eConsent Setup
In tab eConsent, you can add Email templates for use in the eConsnet process – i.e. thentext template used when sending a copy of the signed consnet form(s) to the participant.
See section eConsent for details of eConsent setup and use.
Questions about Magana Trial Manager?
Try setting up your own eCRF in a free test account, or reach out to our team in Regensburg — we usually reply within one business day.