Magana Trial Manager – Site Users' Guide
On this page (18)
- Introduction
- Getting Access
- Invitation
- Setting a Password
- Logging in
- Two Factor Authentication (2FA)
- Preventing Unauthorized Local Access
- Managing Participants
- Status Indicators
- Working with Forms
- Optional Forms
- Context Menu
- Locking and Signing Forms
- Working with Queries
- Randomising participants
- Sending out Surveys (ePRO/eCOA/eDiaries/...)
- By email
- Getting Help
Introduction
This is the Site Users' Guide for Magana Trial Manger. It is intended as a reference for people working at the study sites such as study nurses and physicians. Accordingly, this document is focussed on typical tasks carried out by the intended audience such as recruiting study participants, documenting clinical data, signing forms etc..
Depending on the specific study project and your role in the study, some of the following sections may not be relevant for your work.
Getting Access
Invitation
Although it is possible to register a user account in Magana Trial Manager proactively, the recommended method for site users is to wait for a study invitation sent by a study manager. The invitation will be sent through our software and contain the name of the study as well as a link to the software. Make sure to keep the invitation email and bookmark the link so that you can easily find the web address during your work on the study.
The email address that received the invitation is you user name for our system.
Please do not reply to the invitation email. It is sent from a no-reply account that will not be read by anyone. If you need help, please refer to section Getting Help.
Setting a Password
If you are new to Magana Trial Manager, you will receive a second email that contains a registration link. When you receive this email, follow the link and set your personal password. The password protects your account from unauthorized access. Therefore, it is important to choose a strong password. Some rules to follow:
- At least 10 characters long
- Contains a mix of letters (upper and lower case), numbers and special characters
- Not a common word or a slight variation of a word (e.g "
$ecret" is a poor password) - Never use the same password (or slight variations) in different systems. Password reuse is the most common cause of data theft and other security incidents.
- Never write your password in an unprotected location – e.g. under the keyboard, post-it note on the screen, etc.
- If you need to write down your password, make sure the location is safe.
Password managers are highly recommended for security.
Our software will enforce some of these rules but all users are responsible for picking good passwords and keeping them safe.
If your invitation has expired when you are trying to register, please contact your study manager and ask for a new invitation.
Logging in
In order to log into Magana Trial Manager, go to https://app.maganatrial.com and you will be greeted by the login screen:
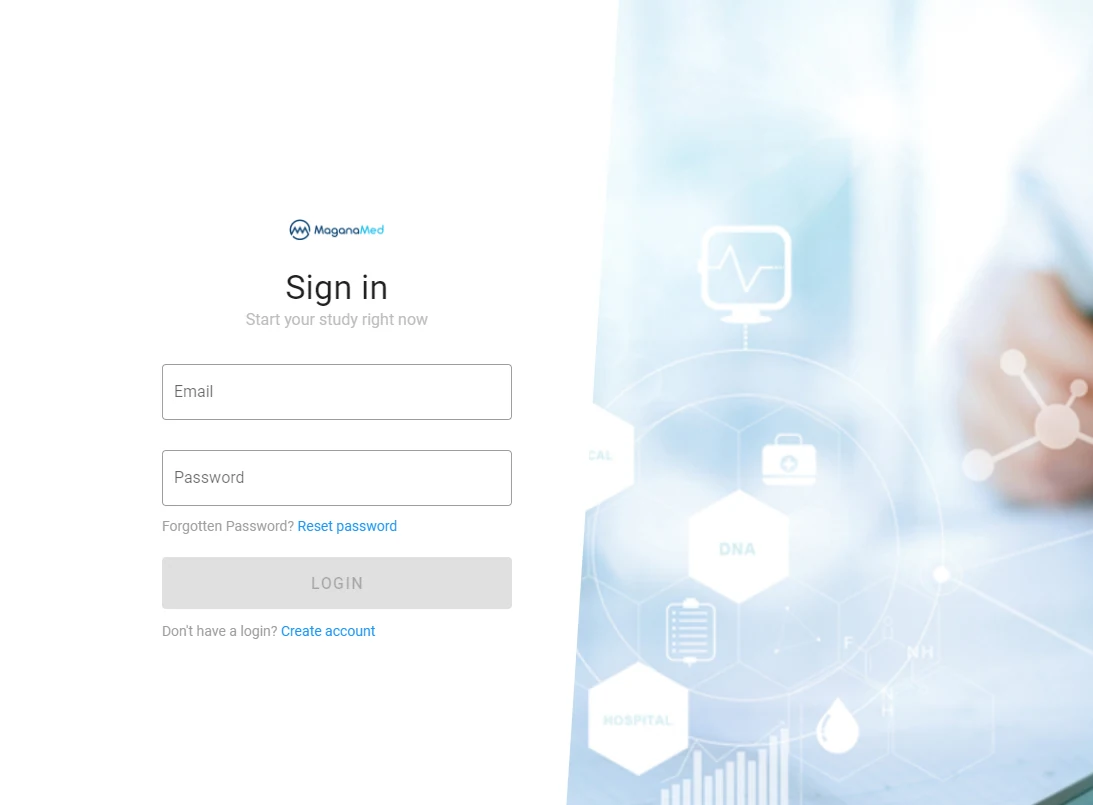
Fill in your username (email address) and password and click Login.
Please note that it is strictly forbidden to work in Magana Trial Manager under a user account that is not yours. I.e. if a colleague is logged into the system, they need to log out first and you need to log in using your own account.
The login form also contains a Reset password link. You can use that link in case you cannot remember your password and need to set a new one. After clicking that link, you need to enter your user name (email address) and if a user is registered under that name, the email address will receive an email with a link for setting a new password.
After logging into the system, you have access to the participants of your study site. The specific things you can or cannot do depend on your role (e.g. Study Nurse) in the study and the permission profile of that role.
In case of login problems, please double check that you are using your email address that the original invitation was sent to and not another email address you may have. Another common reason for login problems is Caps Lock on your keyboard – please ensure it is not active.
Two Factor Authentication (2FA)
We highly recommend adding an additional layer of security to your account: We offer so called two factor authentication. If activated, you will be asked for a 6-digit number at each login.
The number can be obtained through an authenticator app on your smartphone
and changes every 30 seconds. Any app that supports the TOTP method will
work. If you don't have such an app already, we recommend the open source app
2FAS Auth which is readily available from the respective app stores for iOS
and Android. You can get it by following the link in this PDF file or scanning
the respective QR code for your device:
Disclaimer: MaganaMed is not the author or owner of the 2FAS Auth app. For problems with that application, please connect the respective supplier.
In order to activate 2FA in Magana Trial Manager, click on the account logo with your initials in the upper right corner of Magana Trial Manager:

In the account settings dialog, go to the 2FA tab:
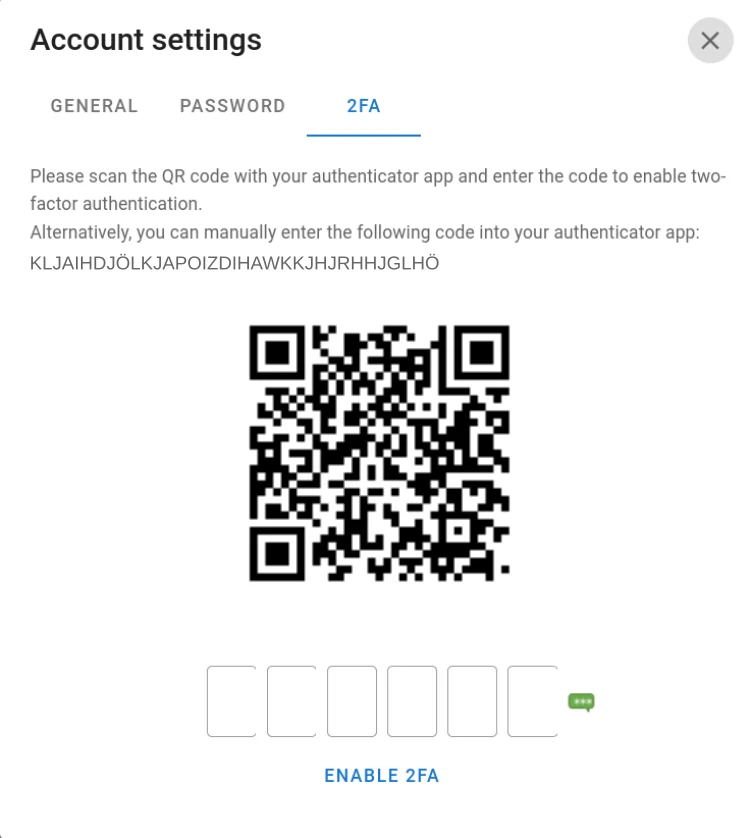
On your phone, open the authenticator app and click "+" , "Add" or a similar icon to add a new site. Scan the QR code on the screen with your authenticator app or enter the displayed code in order to register the account in the app. The app will respond with a numeric code. Enter that code into the field in the 2FA setting dialog of Magana Trial Manager.
Click Enable 2FA and you are done.
Caution: do not scan or use the code shown above – it is just and example for illustration and will not work.
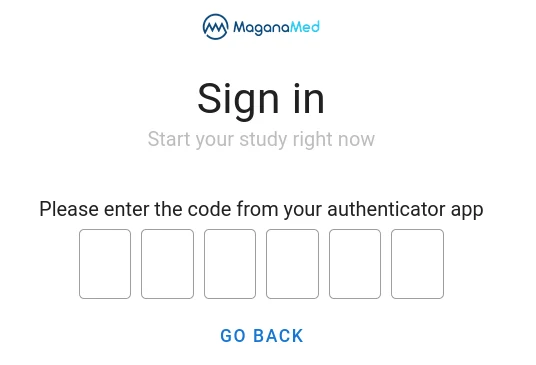
From now on, after entering your username and password, open the authenticator app on your phone to get a valid numeric code and enter that into the field shown on your screen:
Preventing Unauthorized Local Access
In addition to a strong secret password and 2FA, it is important to protect your account by not leaving your computer unattended while you are logged into the system. When leaving the computer (or tablet) unattended, even for a short moment, make sure to prevent others from accessing the system. This can be be accomplished in different ways:
- Logging out of Magana Trial Manager
- Logging out of your device (computer/tablet/smartphone)
- Locking your device (computer/tablet/smartphone) so that entering your password is required to regain access to the machine.
Managing Participants
You can find a list of all participants by selecting Participants in the main menu. Of course, you will only see participants that belong to your study site(s).
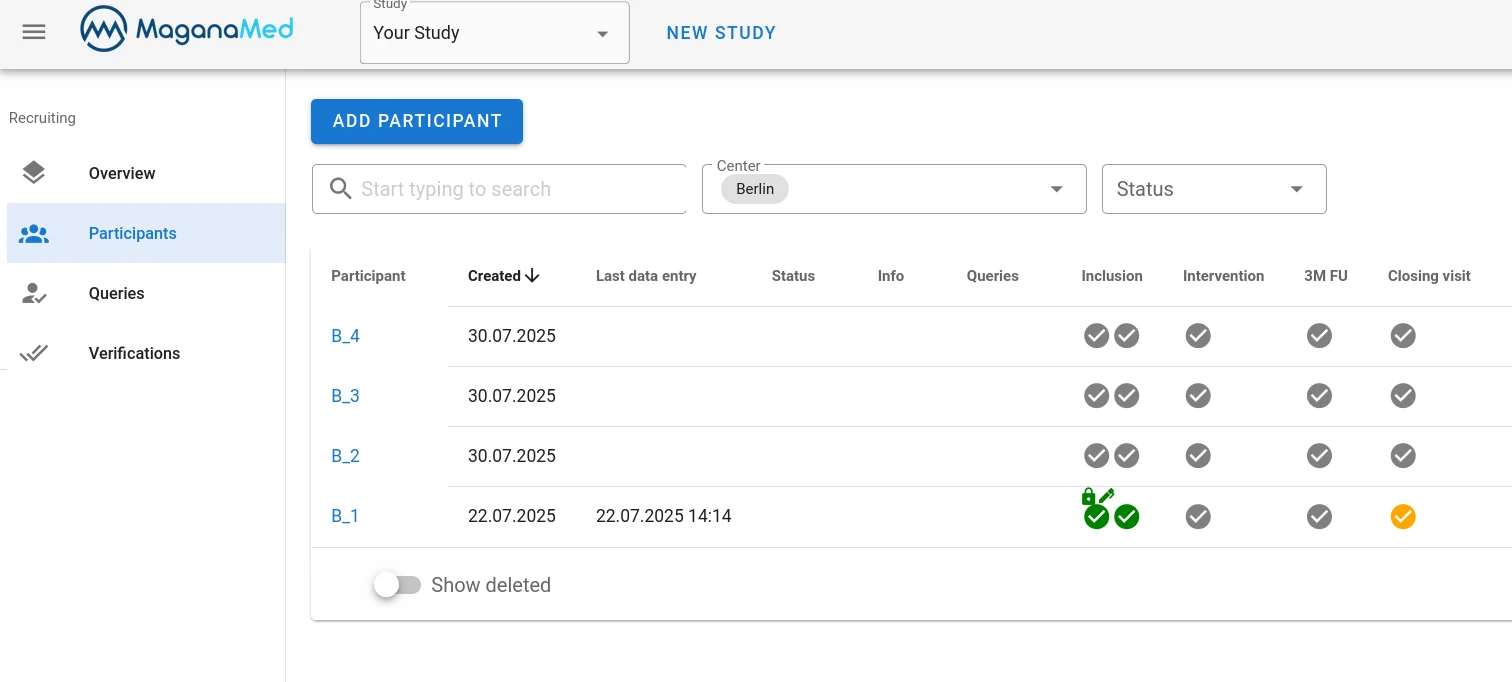
If your role is authorized to recruit new participants, you can click the Add Participants button to create a new study participant. If you have access to multiple study sites, you need to select which site you want to add the participant to. The participant will automatically receive a participant-ID. Click the Add button to confirm and the new participant will be created and you will automatically enter the participant view:
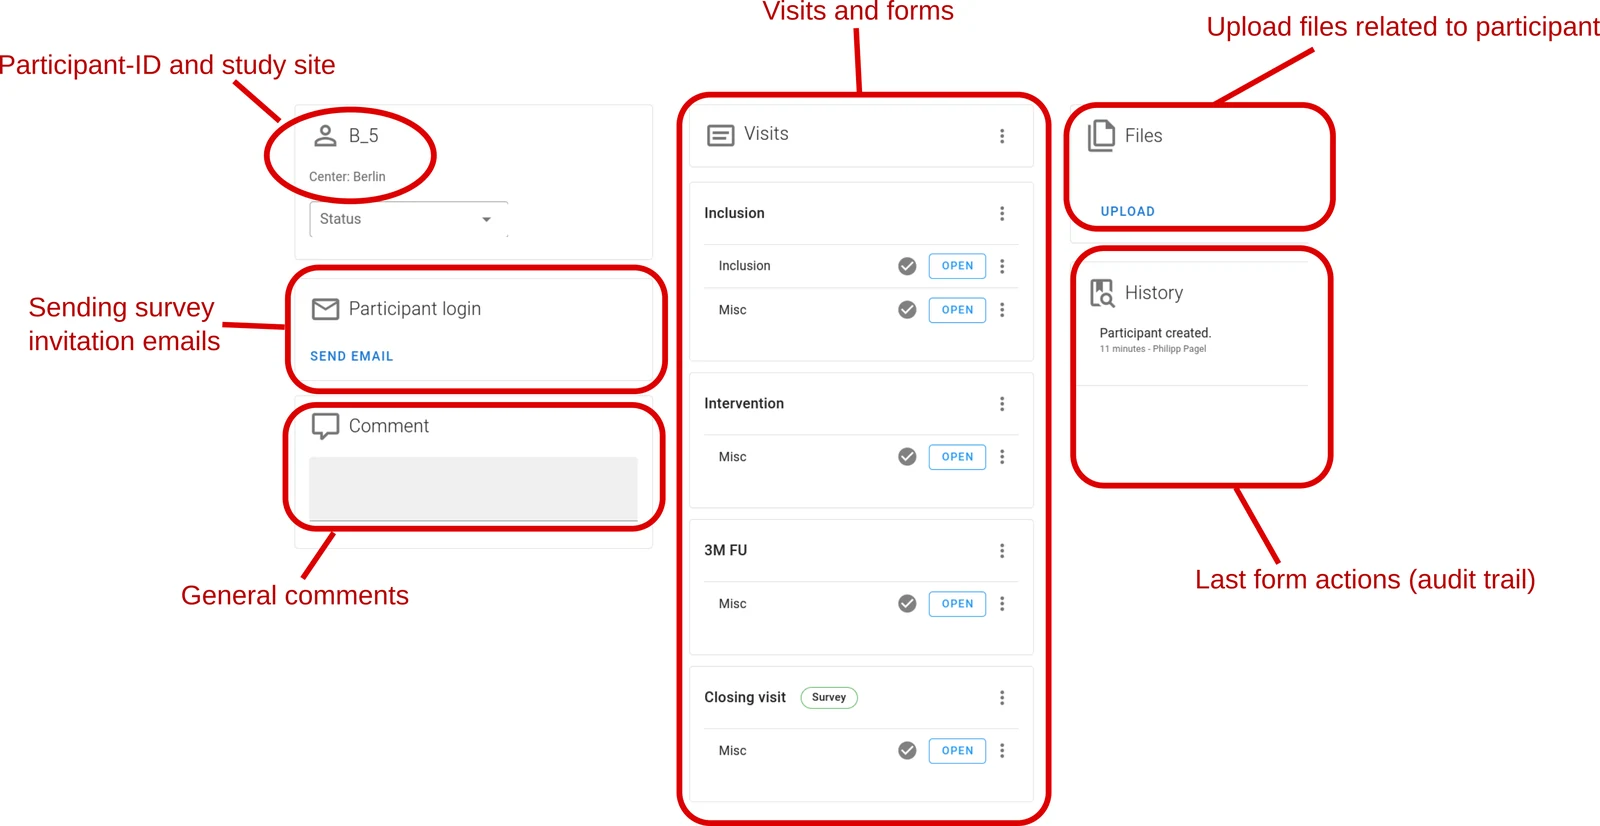
Depending on your permissions, there may be a Delete button next to the participant-ID. Clicking that button will mark the participant as deleted and they will no longer appear in the participant list. However, the data set is not really deleted from the database and you can still make these participants show in the list by activating the Show deleted toggle below the participant list.
Status Indicators
In the participant view as well as the participant list, you will see little check mark icons next to each form. They represent the status of the form:
 The form has never been worked on.
 The form has been worked on but not
finished.
 The form has been finished.
These status indicators can be decorated with additional symbols:
- A pen indicates that the form has been signed.
- A padlock indicates that the form has been locked.
The additional symbols appear on top of the check mark icon. E.g. for a signed
and locked form:

Once a form has been locked, changes to the data are no longer possible. If you need to make changes to such a form, contact someone at your site who has lock/unlock permission. If in doubt, open the form and find out who locked it in the first place. That person has the necessary permission to unlock it again.
If a form has been verified (by a monitor), there is a green double check mark
icon next to the form: 
Working with Forms
In order to work on a form, click on the Open button in the participant view. You will now enter the form view:
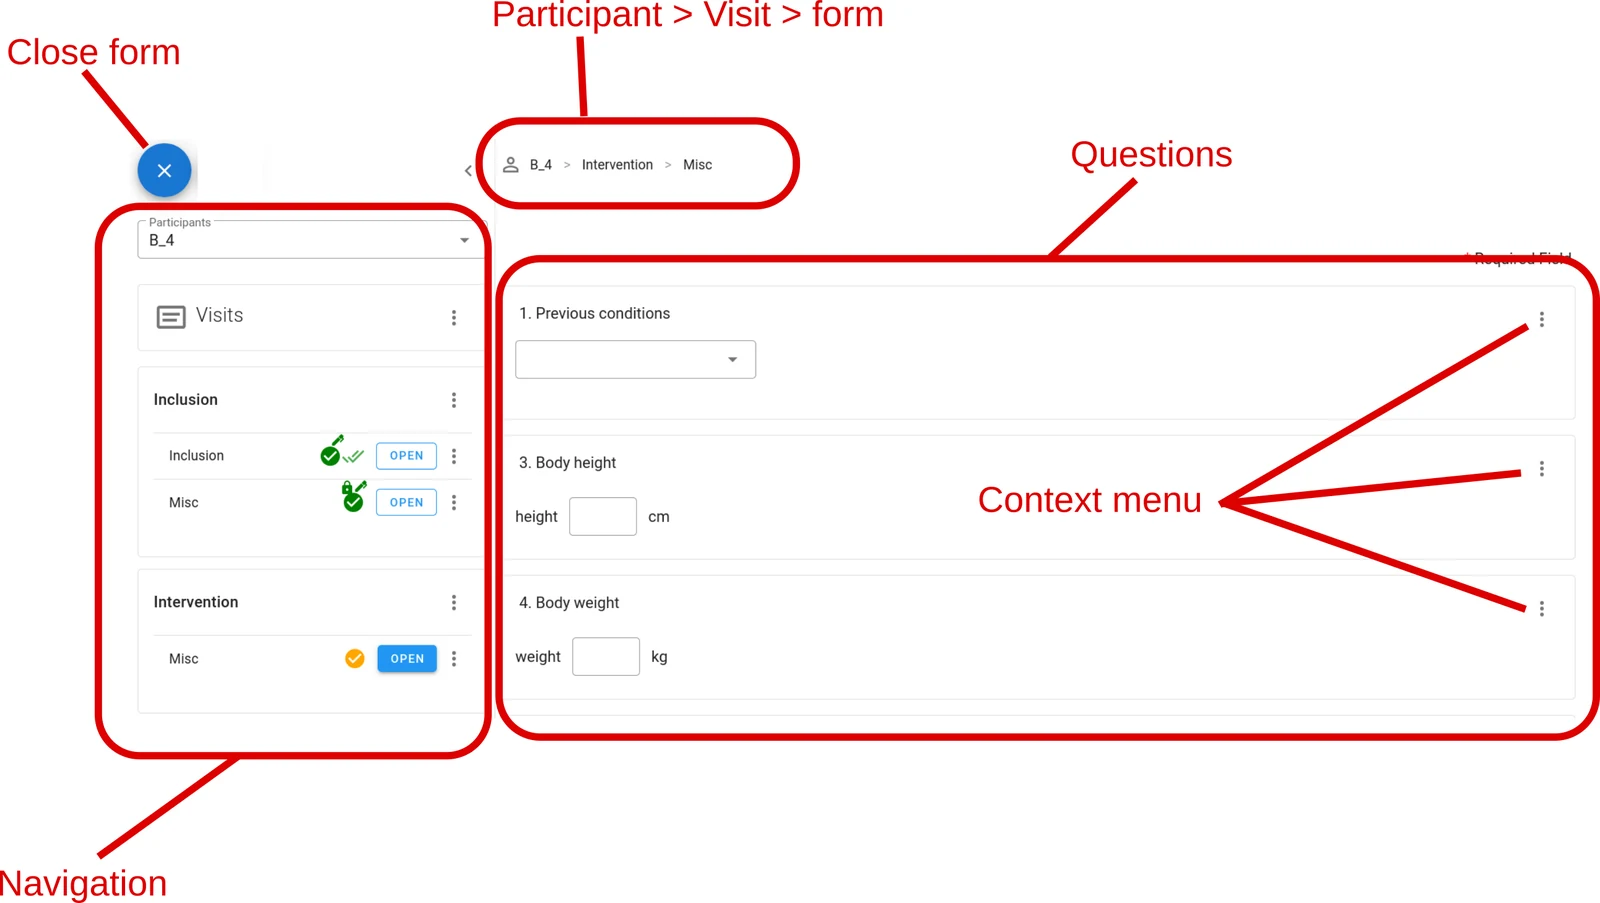
You can now enter all data into each question of the form. If you want to exit the form before completing data entry, click the closer icon at the top left ("X"). The status indicator of the form will now be orange. To indicate that you have completed data entry in this form, click the Finish button at the bottom of the form – the status indicator will now be green.
Some or all questions in a form may be mandatory – those are marked with a red asterisk adjacent to the question title. Forms can only be finished after all mandatory questions have been answered.
You can now open the next form in the visit you are documenting. If a visit has many forms, it can be more convenient to click Finish and Next, instead. That will finish the current form and immediately open the next form in this visit. If you click Finish and Next in the last form of a visit, the system will warn you that you are about to enter the next visit in order to prevent accidental data entry into the wrong visit.
All data you enter is saved to the database immediately, so you will not loose data by exiting a form. The Finish button is not a Save button but indicates that you are finished with this form.
In case you finished a form accidentally, You can remove the finished status by selecting Mark as unfinished in the forms context menu in the participant view.
Optional Forms
Sometimes, a study contains optional forms. These forms are only added and filled in under certain conditions. A common example are forms for documenting adverse events. They are optional because many participants may never suffer such an event. At the same time, AE forms typically can be added multiple times, because it is possible that a participant experiences more than one adverse event over time.
Typically, optional forms are located in an auxiliary pseudo-visit (Auxiliary forms, Optional forms or similar) at the end of the visit plan. But they may also be available in other visits.
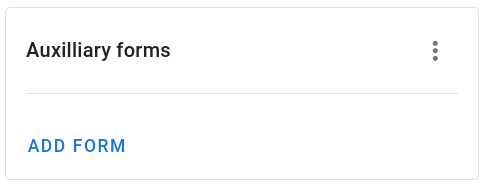
When such a form is needed
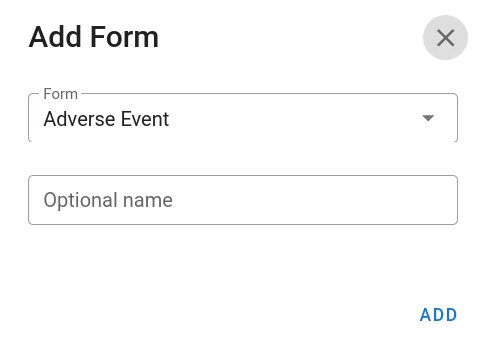
- go to the respective visit and click on Add Form.
- Select the required form from the drop-down menu.
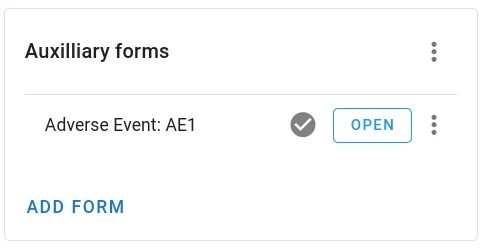
- You may add an optional name ("nickname") for easier identification – e.g. "AE1" or similar.
- Click Add
The form will now appear in the respective visit and can be filled in as usual.
Context Menu
Next to each question, there is a context menu icon (three dots). The context menu contains a number of additional options. The following options are typically relevant for site user:
- Notes
- You can enter arbitrary notes to yourself or other people into this text field.
Caution: this is not a field for official data collection! It is intended as
a better alternatives to post-it notes helping you to organise your work.
A text icon ( ) will appear under the context
menu icon to indicate the presence of the note. Clicking it will open the
note.
- Missing
- Sometimes you cannot answer a question because the data is unavailable
(Unknown) or cannot be applied to the particular participant for some reason
(Not applicable). In order to indicate that you did not forget to enter the
data point but cannot do so, choose Missing, select the correct reason form
the drop-down menu and add an explanation in the text field. This will make it
easier for the monitor to decide if a query should be opened on the question.
A M icon ( ) will appear below the
context menu icon indicating that a missing note is present. Clicking it
will open the note.
- Queries
- Users with the necessary permission can open queries from the context menu and site users can answer them here. See section Working with Queries for details.
- Audit trail
- Here, you can look at the audit-trail for this data point. It contains one entry per change and shows a time stamp, the name of the user who made the change and an indication of what was changed for each entry. Every data change will append a new entry to the audit trail.
Locking and Signing Forms
Some roles will have the permission to lock and/or sign a form. In the participant-view, there are context menu icons (three dots) next to each form and visit. These menus contain lock and sign items.
Locking a form prevents any further changes to the data. If you need to edit data in a locked form, it must be unlocked, first. Unlocking can only be done by users who have lock permission. The fact that a form is locked is indicated by a padlock icon and explicitly stated at the top of the form when opened.
Signing a form indicates approval of the form – e.g. after checking it for completeness or correctness. Typically, sign permission is granted to site physicians but other arrangements are possible. For regulatory reasons, signing a form requires re-authentication with your username and password. The signature is indicated by a pen symbol next to the status indicator of the form. Signatures are also shown in the Verifications overview, including a time stamp and user name. It is a good idea, to also lock the form at the time of signing so that no changes can be made to the form anymore. If a signed form is not locked and a data change occurs, the signature is automatically invalidated.
Signatures can also be removed manually (unsign) by users with sign permission.
Working with Queries
When monitors or similar roles find a problem with a data point, they will open a Query – i.e. a request for data checking and correction. Opening and closing a query requires Query permission but all users with Edit permission can answer a query.
In the forms, a query is indicated by a speech-bubble icon:
 The color of the icon indicates its state:
- red
- Open, awaiting an answer
- orange
- Answered/resolved but not closed, yet
- green
- Closed
If multiple queries have been raised for a form, the color of the query icon represents the least advanced query. E.g. one closed and one open query: red query-icon.
Clicking on the icon will open the query form.
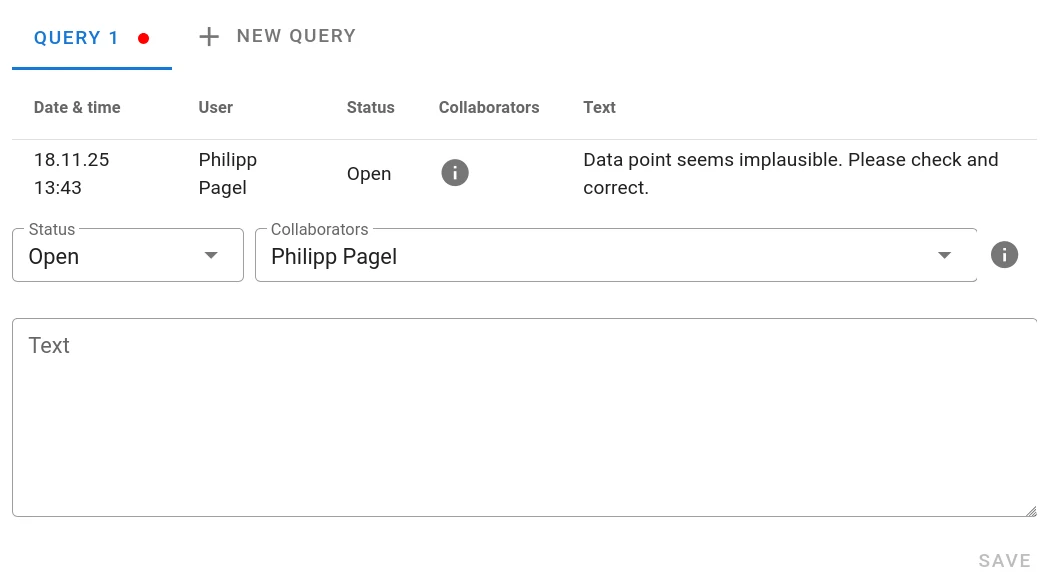
Acting on a query comprises the following steps:
- Open the query form, select the correct query tab and read the query text (What is the problem?).
- Close the query form and act on the problem raised. I.e. add or correct the data point as appropriate
- Open the query form and set the query Status to Resolved in the drop-down menu
- Enter a response into the text field. E.g. "Data double checked: it is correct" or "Checked and corrected.", ...
- Click Save
After setting the query status to Resolved, the query icon turns orange, indicating that the query has been answered and the monitor can now check your answer and hopefully close the query.
You may select other users from the Collaborators drop-down menu. These users will receive email-notifications when the query status changes (e.g. it was resolved).
In order to systematically check for open queries, select Queries from the main menu. You will now see a list of all queries present at your site(s):
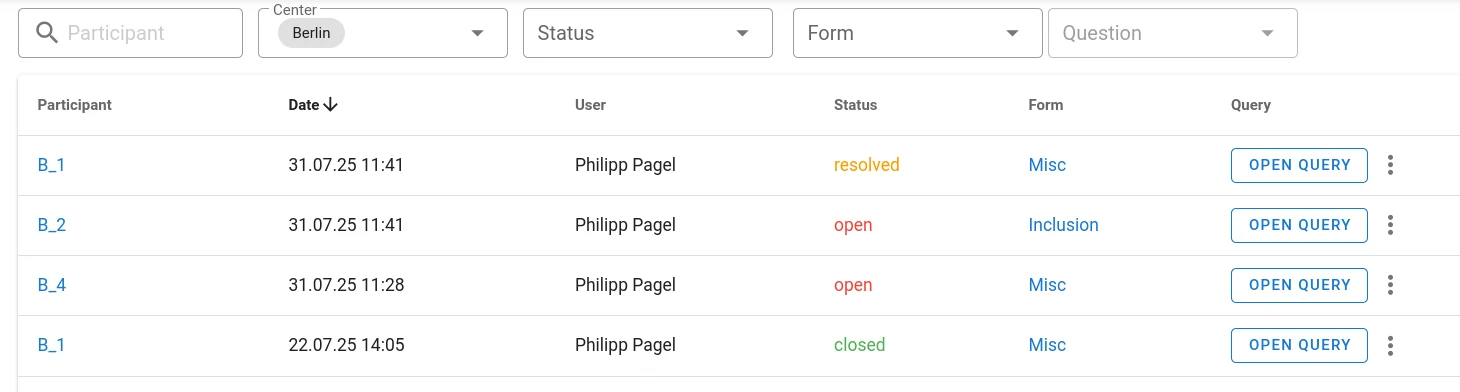
At the top of the list, you find several filter setting that allow you to restrict the list to a subset of queries.
Site users are mostly interested in Open queries, because those are the ones you need to act upon. In order to only see the open queries, select open in the Status filter at the top of the query list:

Clicking on the name of the form in the list will directly take you to the respective form where you can then open the query for answering. You can also directly open the query form by clicking on Open Query.
Randomising participants
If you are working on a randomised study, there are two or more study arms (aka groups). Participants are randomly assigned to those arms/groups and treatment will differ between the arms. In a double blinded study, neither the participant nor the site personnel know which arm a participant belongs to. In a single blinded study, only the participant is blinded but site users are aware of the arm.
If randomisation is carried out in Magana Trial Manager, the participant view will show a Randomize button for users with the necessary permissions:
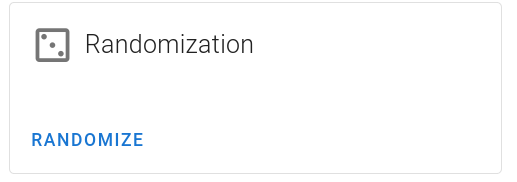
Randomise permission is required to see and use that button. When pressed, the system will choose an arm for this participant based on a randomisation list that has been uploaded to the system. In order to protect that information (double-blinding), a different permission, View Randomisation is required to see the randomisation result (= study arm).
Sending out Surveys (ePRO/eCOA/eDiaries/...)
A study may contain Survey visits – i.e. visits that are not meant to be documented by professional site users but by the study participants themselves. Typical applications are forms that can be filled by the participant while sitting in the waiting room at the site or forms filled from home in remote visitss.
Survey visits are marked with a green Survey label in the participant view:
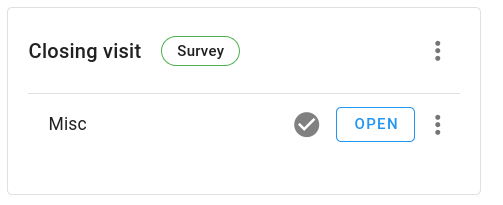
Survey visits can be opened and filled in by site users, but that is not the intended use, except for situations where site users call the participants on the phone and fill in data on their behalf.
There are many different methods of sending survey invitations to a participant, many of them require no actions by site users. Please consult the study managers for instructions if you are unsure how to handle survey visits.
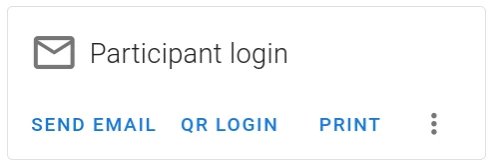
In some cases, the protocol calls for sending invitations manually. In that case, you need to open the participant view for the respective participant and select Send Email in the Participant login box:
By email
Select the correct survey visit from the drop-down menu. Choosing All surveys and diaries will send an invitation to all survey visits at once. Enter the email-address of the participant into the To field and click Send. The Email text has been previously configured during study setup, but you can add/make changes to the text before sending if needed.
The participant will then receive an email with a link to the form to fill in.
Via QR-Code
If the participants are present at your site and you want to have them fill in a survey now as part of a regular visit, select QR Login. A QR code will be displayed.
Scan the code with the device intended for that purpose (typically a study tablet or smartphone). In some cases, that may be the participant's own device.
Corrections and fall-back options
Corrections can later be made by site users, if appropriate. As for all data entry, such corrections will be logged in the audit trail.
This route is also possible in case participants cannot fill in forms on their own. Site users can then fill in the forms on their behalf while asking their answers in person or in a phone/video call.
Getting Help
If you encounter problems or are unsure about handling a situation while working with your study, you may need help. In our experience, 99% of questions site users have, relate to the content of the CRF or study protocol. E.g. how to document a specific clinical data point or how to handle protocol deviations, adverse events, retractions of consent etc. This type of questions can only be answered by the people managing your study – i.e. the CRO or sponsor. At site initiation, you should have received contact details for someone to contact in case of problems or questions with your trial. Please contact them first, as MaganaMed does not know the details and rules of your particular study.
Your contact (to be filled in by the study owner):
Name:
Company/Organisation:
Phone:
Email:
If you encounter technical problems with our software you can contact MaganaMed technical support at support@maganamed.com.
Questions about Magana Trial Manager?
Try setting up your own eCRF in a free test account, or reach out to our team in Regensburg — we usually reply within one business day.