Visit Setup
The visit plan is configured under Setup > Visits. Every study needs at least one visit, most will have many. Visits can take many different forms from the traditional on.site visit to remote visits, e.g. in the context of a remote, decentralized or hybrid trial.
To create a new visit, just click the Add visit button and it will be added to the end of the visit plan. Each visit will display the list of forms used in it (initially empty). Upon hovering your mouse over a visit, a few icons will appear that allow moving, editing or deleting the visit. The visit will then also show any visibility rules attached to its forms.
To edit a visit, click the pen icon in the visit box. You can now configure visit properties and add forms to the visit:
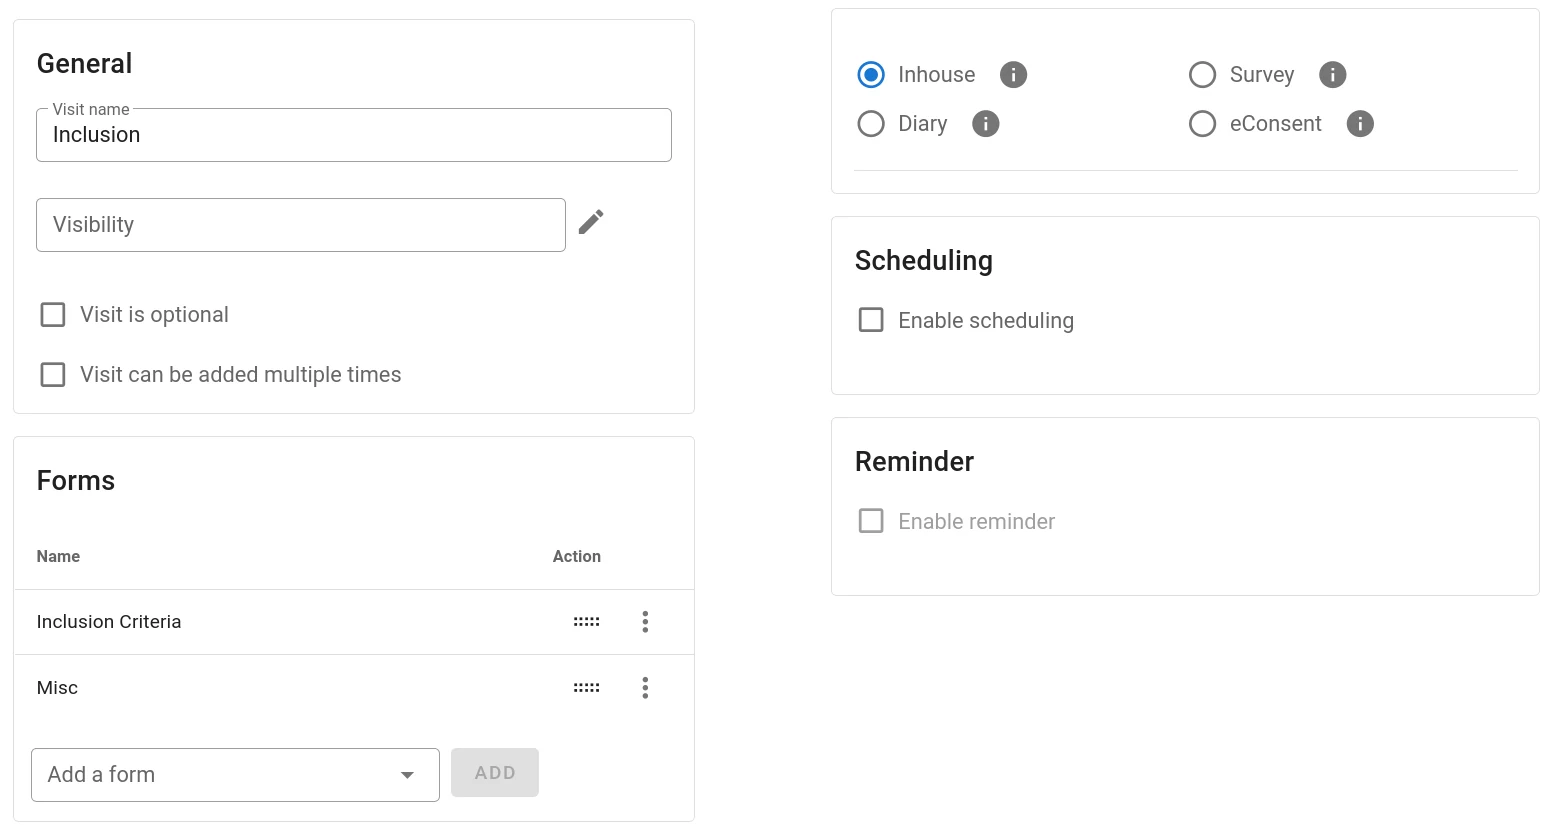
Each visit needs a unique name. You can make the name as long as you want, but we recommend to use brief visit names for best readability. By default, a visit is always shown, but you can define visibility rules that must be fulfilled for the visit to become available in a participant. The conditions are written as MaganaScript expressions (See section MaganaScript).
Visit Options
Visit Visibility
Sometimes, you need to have a visit that is not a default part of the study but may take place under certain conditions. Using visibility rules allows you to show the visit only when needed – e.g. a visit is only applicable to participants with a specific genetic condition. You can also use this feature to hide visits until a condition in a previous visit is met or a defined time has passed after some time point..
Optional Visits
Optional visits (aka unscheduled visits) are not shown in the participants until a site user actively request the visit to be added by clicking Add visit. If the possibility exists that the visit may occur more than once, you can set visit can be added multiple times, so that the same type of visit can be added by site users. These options can be selected separately or together.
That way, you can define unscheduled visits that may occur once or more often as well as allow a regular visit to be duplicated. E.g. when your Protocol calls for at least one visit of a certain kind.
Visit Types
Depending on the modules you ordered for your study, there are several different visit types:
- Inhouse
- A standard, on-site visit. Forms are filled in by professional users at the site.
- Survey
- A visit that will be documented by the participant instead of site personnel. E.g. a remote visit or part of a visit that involves the participant filling in questionnaires. Requires the Survey module. Typical uses include ePRO/eCOA.
- Diary
- Similar to a Survey visit, but all forms can be filled in repeatedly for different time points. E.g. daily. Requires the Survey module.
- eConsent
- A special visit type obtaining and documenting participant consent. See section eConsent. Requires the eConsent module.
Scheduler and reminders
If the Visit scheduler module is active, you can configure scheduling and reminders for the visit. I.e. set a time window in which the visit mus occur and the email-reminder plan to be used to invite the participant by email. See section Visit Scheduler for details.
Adding Forms
Forms only become available after assigning them to one or more visits. Unassigned forms cannot be filled in.
Surveys and Diaries
The survey module supports data entry by the study participant instead of site personnel. This mode of data collection is useful for many different situations:
- Remote visits – e.g. quality of life questionnaires filled in at home
- Hybrid visits – i.e. there is a part where data is entered by professionals and another part filled in directly by the participant – e.g. using a tablet or smartphone. Set up as two separate visits – one inhouse and one survey.
- Patient diaries – i.e. the participant collects data repeatedly, e.g. daily
This mode of operation is useful for ePRO (electronic Patient Reported Outcome), eCOA (electronic Clinical Outcome Assessments), eDiaries and similar applications.
Workflow
There are several different methods of getting a survey invitation to the participant, they serve different needs depending on your specific situation:
- Ad hoc email invitation
A site user enters the participants email address into the address field. The system sends an email, based on a previously defined email template to the specified address. The email address is only used for sending that email but not stored in the database.
Invitations can be resticted to one specific survey visit or allow access to all survey visits of the participant.
Pro: Simple process
Con: Needs to be managed manually by site personnel - External distribution of survey login identifiers
A list of survey-login identifiers is generated in advance and distributed to study participants outside our system. E.g. by an external email system or even physical mail.
Survey identifiers (and the respective links) allow participants to access all their survey visits.
Pro: Easy management of pre-existing cohorts. Allows using pre-established communication channels.
Con: Requires external management of code distribution. - Automated, rule based, invitations using the Visit scheduler module
The visit scheduler module allows study managers to define automatic triggers for sending email invitations to participants. These triggers are based on the time since another event, typically a visit.
Typical rules are 3 months after the intervention or 1 year after inclusion.
Pro: automated process, no manual action required. Flexible rule definition syntax.
Con: Site users have no direct control over invitation process. - Public surveys
A public survey is a configuration that only has one survey URL for all participants. Whenever someone opens that link and starts filling in the form, a new participant is automatically created in the system.
Pro: Easy URL distribution to large number of potential participants who register themselves for the study.
Con: Registration is anonymous and you have no control over who tries to enroll. But of course, you can set inclusion criteria for actual recruitment. - On site survey
The participant comes to the study site as usual. Site personnel Scans a QR-Code with a mobile device (e.g. a tablet) and is hands it to the participant in order to fill in one or more forms.
Irrespective of the chosen workflow, site users are always able to fill in survey forms themselves as a fall-back option. This is important in case the participant is not capable of or willing to fill it in alone. In that case, a site user can ask the questions and enter the answers on site or during a phone/video call.
Under Setup > General > Survey you can configure man different settings for your surveys.
Study participants do not get regular user accounts and passwords the protection is implemented as a long random string of characters that is unique to the participant (and visit) in order to prevent link guessing attacks. In addition, you should configure the link-lifetime (link expiration) so that they remain valid only for the required period as described below.
Login identifiers
Login identifiers are sequences of 16 random characters resulting in 4.36 × 10²² (43.6 sextillion) possible links. So if all humans on earth (8 × 10⁹) were participants in our system, the chance of guessing a valid link would be 1 in 5.45 × 10¹² (one in 5.45 trillion).
These identifiers can be embedded into web links so participants do not need to enter them manually. Alternatively, they can be distributed separately, requiring participants to enter them.
In order to allow the use of login-identifiers, check Allow login-identifiers in the Survey configuration tab. After that, login identifiers can be generated in two different ways:
- Interactively in the participant view (Generate Participant login) to create a single login identifer, tied to the respective participant.
- In bulk from the survey setup tab.
These identifiers are not tied to specific participants. Instead using identifiers from the pre-generated identifier list will automatically create a new participant upon first use.
So pre-generating identifiers is most useful in situations where you want to send identifiers to a known cohort, outside the system.
To bulk-generate login identifiers, go to Setup > General > Survey and enter the desired number of identifiers into the field next to the study site. Click Generate and then Download to get the list of all identifiers for that center..
Login identifiers remain valid after the participant has completed the form(s). If you want to prevent the participant from going back and editing the form, later you can lock the form. This can be done automatically by selecting lock form after completion when adding the form to a visit (Visits > Context menu of the form > Autolock).
Defining survey URLs
To make your survey accessible to external participants via pre-generated participant login-codes or as a public survey, you must assign a URL (web address) to your survey for each study site. To assign a URL, go to setup > General > Survey. If (and only if) you have selected to allow login-identifiers or made this a public survey, you will see one field for each study site. The fixed part of the URL is shown in all of the fields and cannot be changed, but you can enter your own subdomain(s). If you are trying to use a subdomain that is already in use in another study, an error message will appear.
In most cases, you can use a single subdomain for the entire study. In that case simply enter the same subdomain name in all of the site fields. If however, you want a separate URL for each of your study sites, you can give them separate subdomains.
Public surveys
When the option public survey is selected, anyone with the URL can enter the survey. No participant identifier has to be entered. The system will automatically create a new participant for each such access. These participants are anonymous, so if you need to contact these participants later, you need to implement a strategy for making them contact you. In order to make mapping easier, we recommend adding instructions for participants to the survey forms.
Email expiration
By default, survey invitation links never expire. We strongly recommend defining a link expiration time in order to prevent access at much later times. Set an appropriate number of days in the Email Link Expiration field. Typically, expiration times of 7, 14 or maybe 30 days are appropriate in most cases.
Email templates and other texts
You should configure a short text that will be shown after participant login and after finishing all forms in the respective text fields.
In order to build a template for email invitation messages, add a new template in Email Templates. Define a name (label) for the template, a subject line and text body for the message.
Make sure to always include the phrase [LINK] xxxx [/LINK] in all templates –
it is the placeholder for the invitation link that the participant is expected
to follow.
Email templates accept many common HTML tags for formatting. So you can
use markup like bold (b>xxx</b>), paragraphs (<p>xxx</p) etc.
See section Using HTML tags for more examples.
As an advanced option, you can assign a visit and/or a center to this e-mail template. Then this template will be used only for the selected visit/center.
When a survey is sent by e-mail, the selection of the template works like this:
- a template is searched that matches the participant center and the visit.
- if none is found, a template is searched which matches the visit and has no center.
- if none is found, a template is searched that matches the center and does not have a visit.
- if none is found, the default template is searched, which has neither center nor visit.
Paper/print templates
In case you want to print out survey invitations and give them to the participants on the first visits, you can also define print templates in the same way as described above. Site users can access these pages from the participant view: Recruiting > Participants > PARTICIPANT_ID > Print.
In these templates, you can use several placeholders:
{{survey.login}}– the 16 chars login for the participant.{{survey.url}}– the configured survey url{{survey.qrcode}}– a qrcode for accessing the survey quickly via smartphone{{participant.identifier}}– the participant identifier
It is possible to define separate templates for each site/center.
Creating survey visits
To create a survey, configure everything as described above. Then create a visit, select Diary in the upper right and add the form(s) for the survey.
When a survey is part of a visit that also contains regular elements that are filled in by site personnel, split the visit in two. E.g. V3 6 month follow-up (participant) and V3 6 month follow-up (site).
eDiaries
eDiaries work exactly like surveys, but the participant can fill them in
multiple times – e.g. daily to create a diary. A new set of survey forms is
created each time the participant opens the diary link and clicks the add icon
( ).
To create a diary, configure everything as described for surveys. Then create a visit, select Diary in the upper right and add the form(s) for the diary.
Set-up of visits as eDiary and assignment of forms
To set up a visit as an eDiary enter setup → visit.
- Select "diary" as visit option
- Assign one or more forms to the visit
- Select the three dots at the rights side of each form for further
options
- whether the respective form shall be automatically locked after form completion
- visibility settings
Note: each form connected to a diary visit can be added multiple times by the participant. The eDiary can be accessed by the participant via the survey log-in code (see section surveys).
Form Visibility
In this item, you can define conditions that must be met in order for the form to be shown in this visit. Example: Only show the prostate examination form for male participants.
Similar to questions in forms it is sometimes necessary to view a visit only under certain circumstances, which not every participant receives.
To enter the visibility settings go to setup → visits → pen symbol of respective visit → three dots at the right side of the respective form → configure visibility
Enter conditions
Define your condition in the respective field. Following operators are allowed:
&& || ! () < > =
All variables must start with a $ in formulas; e.g if your variable
is called "weight" you have to use the expression $weight in your
formular.
Examples:
($a1 && $a2) || ($a3)
Questionnaire will be shown if answer 1 and answer 2 are checked or answer 3
($a1 != 1)
Questionnaire will be shown if answer 1 value is not equal 1
($a1 >= 1)
Questionnaire will be shown if answer 1 value is larger or equal 1
center_name == "center 1"
Visit will only be shown to participants of center 1
Setting aliases
To support the definition, you can use aliases for every question. Note that the aliases will also be used in computed fields. Thus, a change of an alias will also affect computed fields.
Test condition
The setting of dependent visibilities can become complex. Thus, this option allows you to test the functionality of your settings on selected participants. We recommend creating at least two test participants of whom one shall receive the visit and one shouldn't.
Defining a condition for the first time can be difficult. If you need any assistance contact us at info@maganamed.com.
Visit scheduler
Using the visit scheduler module, it is possible to define time windows for visits depending on reference dates (e.g. day of inclusion).
- Enter the visit setup
- Select enable scheduling
- Enter expression into the date computed field.
Typically, you would want a fixed time after some other event. E.g. 30 days
after the Intervention visit:
date_add($date_intervention, 30, "day")
or
date_add($Vintervention.date, 30, "day")
Of course, you need to define the alias$date_interventionor the aliases$Vinterventionand$dateassociated with a date field in the appropriate form and visit. See MaganaScript for details on the syntax of these computations. - Define the allowed time window before and after the calculated date as defined in your study protocol. E.g. something like ±5 days.
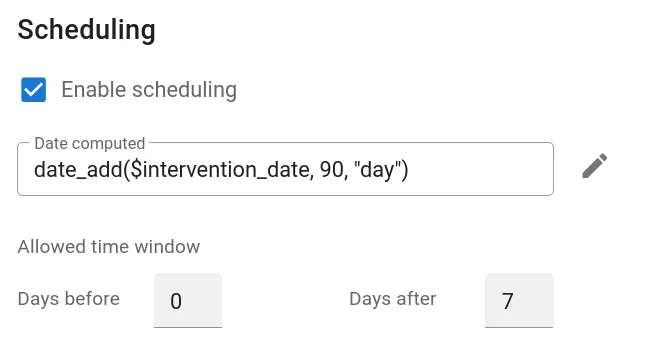
The definition of the time window for the visit will result in the display of the target date next to the visit name for each patient in the patient details screen.
All scheduled dates can be accessed in the calendar, which can be accessed via the navigation panel on the left.
Automatic visit reminder
Participants can get automatically reminded on scheduled visits.
To set-up an automatic reminder for a specific visit:
- Enter the visit setup
- Set-up a scheduled visit
- Select enable reminder
- Define the time point of the first automatic reminder email
- Set the number frequency of the reminders
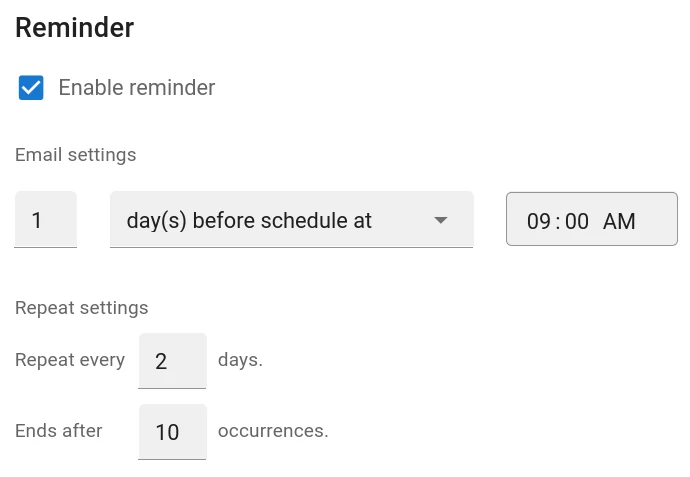
An active reminder for a participant is indicated by a green light in the participant detail screen in the section "reminder". If the reminder is inactive (orange light), no email is defined for that participant. Please enter an email in the section "edit identity"
Notes:
- a participant can only be reminded, if an email address is saved with the participant
- an email can only be saved with the participant, if the user has the "identity" permission
- The reminder log will log all time points of sent out emails
Questions about Magana Trial Manager?
Try setting up your own eCRF in a free test account, or reach out to our team in Regensburg — we usually reply within one business day.